Awkward repair

Hi all

i am having some trouble in thinking how to fix this repair job. 


I have a carbon race stand up paddle board which has a semi sunken deck to increase stability, these boards have drain holes. The right side drain holes are cracked on the inner and outer edges, I have repaired the inner edges (see pic) with small overlapping sheets of glass and resin. Haven’t applied a top coat, wonder if I should? This area will be covered with new deck pad so not too worried about my ugly work, I’ll also spray white before laying deck pad.


its the outer edges I’m having trouble with as I don’t want to have to sand down the text on the side of the board. I’m hoping the Job can be done quite cleanly and leaving the board as it was. 


i  was thinking of 2 possible methods…


1 . Cover the edges with resin filled with chopped glass. Only clover the edge and minimal overlap the avoid the paint work. Sand back. Never used resin filled with chopped glass before, would it be suitable for this scenario?


  1. use small sheets of glass again and do my best to avoid the black text. Even if I got some resin over the text could I sand it back by hand without sanding into the paint text?


any tips would be greatly appreciated


jon


I would masking tape the inside with the edge of the tape standing a little proud of the surface. Prop it so that surface is up. Mask the lettering to be safe. Use a small brush to work the resin around the edge up to your tape. Add a few strands of fiberglass string around the edge that you are repairing. Sand and touch up as needed, stay away from lettering. 

This is gonna sound a little screwy, but bear with me, 

Y’see, this surf shop I worked at rented sunfish sailboats. Which had daggerboards in through-deck wells. Some of our customers apparently thought they were invading Normandy back in 1944 and they’d scream into the beach with the daggerboard down, which would crack the inside of the daggerboard well right at the back and I had to try to figure out how to fix it without leaving a great cobby blob there that would need to be ground down somehow- bad repair. Just using resin wouldn’t work, it needed to be reinforced, 'cos you never knew when somebody else might be storming the beach. 

What I finally figured out was to place some wetted out cloth inside by the crack, resin set to go off slow, then sneak a bike inner tube or similar in there, deflated, and put the air to it, and then that would inflate and push the wetted out cloth into the end nice and tight. Kind of vacuum bagging in reverse. 

Now, you can do something similar. Wetted out cloth in the drain hole after masking your logo there and around it in general to deal with drips and such. Then, use a toy balloon or something else similar ( I’d avoid the pre-lubricated ones and definitely not use the ribbed kind) made of rubber and inflatable to expand the cloth right tight inside your drain, Blow it up, tie a knot in the end of it and wait. it might even bulge a little where it clears the hole and hold down the edges of your cloth on the side of the board. Let the resin go off, remove your inflatable pal carefully, sand nicely where it needs it, then paint. 

By the way, if it was cracking on the one side the other may not be far behind. A little resin brushed on there might be a good thing, no?

hope that’s of use

doc…

Thanks Huck that’s a great idea, little tricks like that that I was looking for. I can see that working. 


May I ask what you mean by “a few strands of fibreglass string”? Pull the cloth apart and take individual strands and place them on the resin around edges? Or cut small pieces of cloth ?

thanks again

Thanks so much doc, I was hoping you would lend a hand. That’s an ingenious idea, although I wasn’t planning to go that deep in the drains with glass. 


you’re of course on the money with the other side, I just was trying to tell myself it’s probably fine, but yes I’ll remove the deck pad and brush some resin around the edges. Do you think the chopped glass filler would improve the job or pointless?

Thanks again

Pull some strands

No worries, happy to help. 

The nice thing is you can go as deep or as shallow as you want with the cloth. If, say, you wanted to go with 1/2" to 3/4" wide with your cloth, total, and have half in and half out, all good.

If you also kinda open up the weave where it turns the corner and goes on the sides by hand, distort it a little, to get it to turn the corner and sit better on the side, not a bad thing. If that made sense at all - gah. Not exactly sure how big those drain holes are, but you could work the dry cloth with a cardboard tube about the same diameter. Making a zillion little cuts with scissors is your next option, like you would with sheet metal doing something similar… 

Chopped glass- I have dealt with it in auto body filler, Bondo type stuff, and there it ( AKA Kitty Hair) works on thicker coats, keeps the Bondo alone from cracking. But otherwise, I think of it as three things. First, psychological, you think it’s doing something though with the exception of filler , thick filler at that, it really isn’t. .

Second, it tends to clump if it’s of a useful length and set in plain resin - and make lumps or fibers sticking up, like you get if you’re getting too aggressive working with fiberglass mat. You have this hairball saturated with hardened resin that you wind up grinding - 

And third, it makes it harder to sand even if it’s down nice, You wind up grinding resin to dust plus little bits of glass fiber which in my experience is the most effective itch powder known to man. 

Me, I’d either add a strip of the kightest ( 2 oz? Certainly no heavier than 4 oz. ) cloth you can find or just go with the resin. I’m assuming a good epoxy, yes? Don’t want to complicate things. 

Now, what do you think caused the cracking and chipping in the first place? That’s what you need to beat, if it’s more or less erosion and the occasional hit over time then fill and sand and paint and call it a day. Otherwise, life gets interesting. 

hope that’s of use

doc…

Okay great regarding the chopped glass, I won’t. 


That’s an excellent point about why it’s failed here, and something others have said. I wish I knew but the answer is I don’t know. I pirchased The board in used condition from a guy interstate then had a marine craft courier transport it to me. The seller said board was watertight never been damaged, but it’s almost like it’s been dropped and landed on its right side, dislodging the drain pipes. There were 2 nice scratches down the right side too, also a puncture on the inner side of the dugout section near the front right drain hole.

i just tend to purchase a couple of the cheap 5 min 1:1 push tube epoxy. Hope that’s okay. I’ll spray with auto paint and then gloss coat. Hopefully that’s enough for uv discolouration 

Huh- I didn’t know there were ‘marine craft couriers’ - I have a thing for rowing shells and I wish I had known about those. Anyhow- 

Yeah, I’ve bought a few things over the years that didn’t come through as nice as promised. It could well be it was dropped, etc. If it’s built as ultralight as some of the competition paddleboards I’ve seen, yeah, bad things happen if you give them a dirty look. 

Umm, see if they wiggle at all if you put your finger in 'em and try it  a bit? If they do, use cloth. If they don’t, well, go with resin and see how that holds up. 

Now, the ideal stuff for doing epoxy work on surfboards is the Resin Research epoxy, which they only sell in expensive quantities. A couple of outfits ( just looking now) sell smaller quantities of it, still not cheap. If you can get the twin tube stuff to wet out cloth, all good. Try an experiment. It’s definitely not happy in direct sun, but white paint is about as good as you’re gonna get to protect it from UV. .

For what it’s worth, I’ve dealt with these people in the past, liked their product. See the Surfboard Repair Kit.  http://www.raka.com/surfboards.html - again, they’re not giving it away either. 

hope that’s of use

doc…


Massive help thanks Doc. It’s you experienced guys giving your time to help inexperienced repairers like me that restores my faith, after losing some when the board turned up damaged.

You’re right on the money. These high end race boards get damaged from a strong gust hitting them. Over the past few years manufacturers have started using sandwich constructions, carbon/PVC/carbon. So much stronger, and still fairy light. This board has a PVC reinforced standing area and inegra over the rails, nose and tail. Elsewhere its just a carbon skin over the EPS foam, very delicate. 

The drain holes dont budge at all and it all seems quite strong still. I think I’m going to go with Huck;s masking tape trick and your recommendation of small pieces of glass over the edges. Let it get tacky then apply a resin/talc fairing coat. Auto spray paint white then clear coat.

I’ll keep you posted with progress and pics


(chuckling) See, those of us who are experienced, well, the experience isn’t all ours. We all learned from somebody, or several somebodys. So, we pass it on. Gonna be your turn soon. Tag, you’re it - 

It sounds like you have a plan. Good,Glad to hear the drains (scuppers, actually) are in there firm, things should be good there and you can always revisit them, it’s not like you’re pulling apart a V-8 or something. 

Enjoy

doc…

Guys!! Firstly, apologies for not updating the progress on the repair job. I got it done and was quite pleased with it, although it probably didn’t look too great.

lates news…took the board in the surf on Boxing Day, quite dumpy here on the Sunshine Coast, Australia. Big heavy shore dump. Anyway, the board got creased in the shore break :frowning:

lots of damage to the rails and underside. When I get home I’ll remove the deck pad and check standing area but surely it’ll be compromised. Interesting to find what looks like dry fibreglass cloth when picking pieces off???

don’t know how to I go about this one. Of course it needs a pros touch but I’m reluctant to spend anymore money on it. 


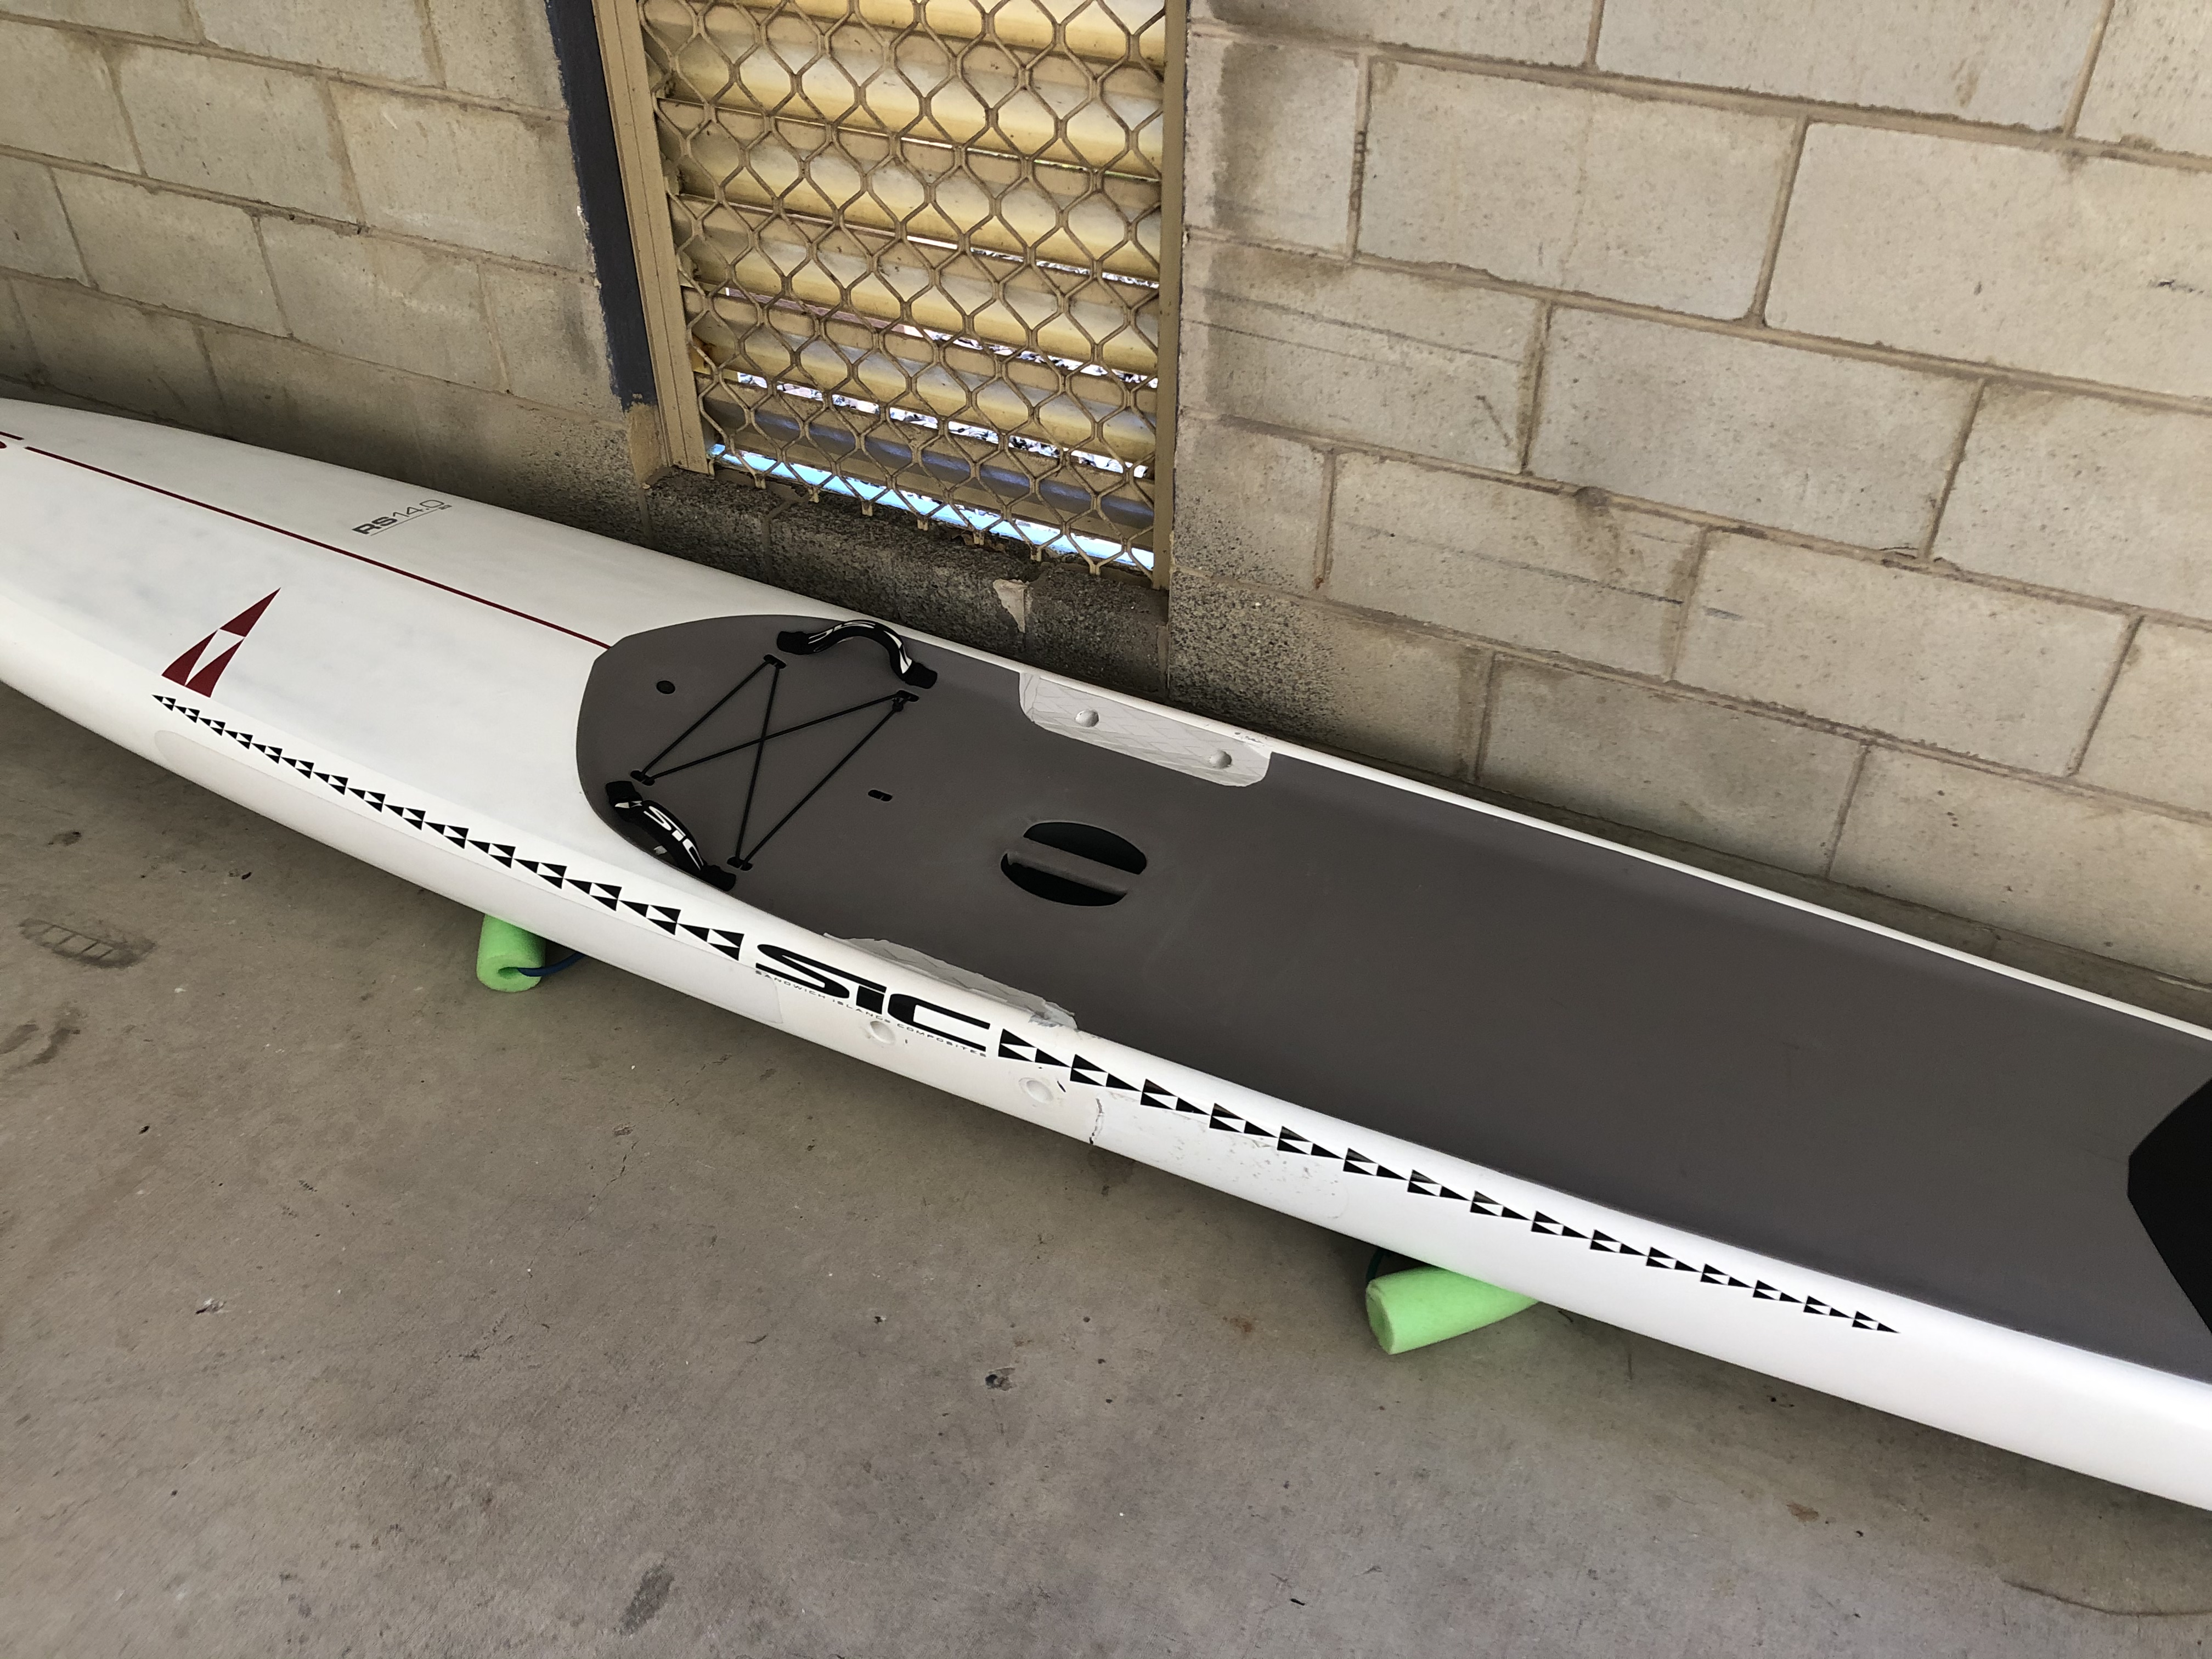
Oh dearie me. Yeah, that’s crunched. As you’ve discovered, that was really meant for flat water or tiny waves and the structure is made accordingly. Well, there’s a cliche about spilt milk that’s real appropriate, now we have to fix it.

First, yeah, you want to get the deck pad off, see what fresh hell lurks there. Then, to work. 

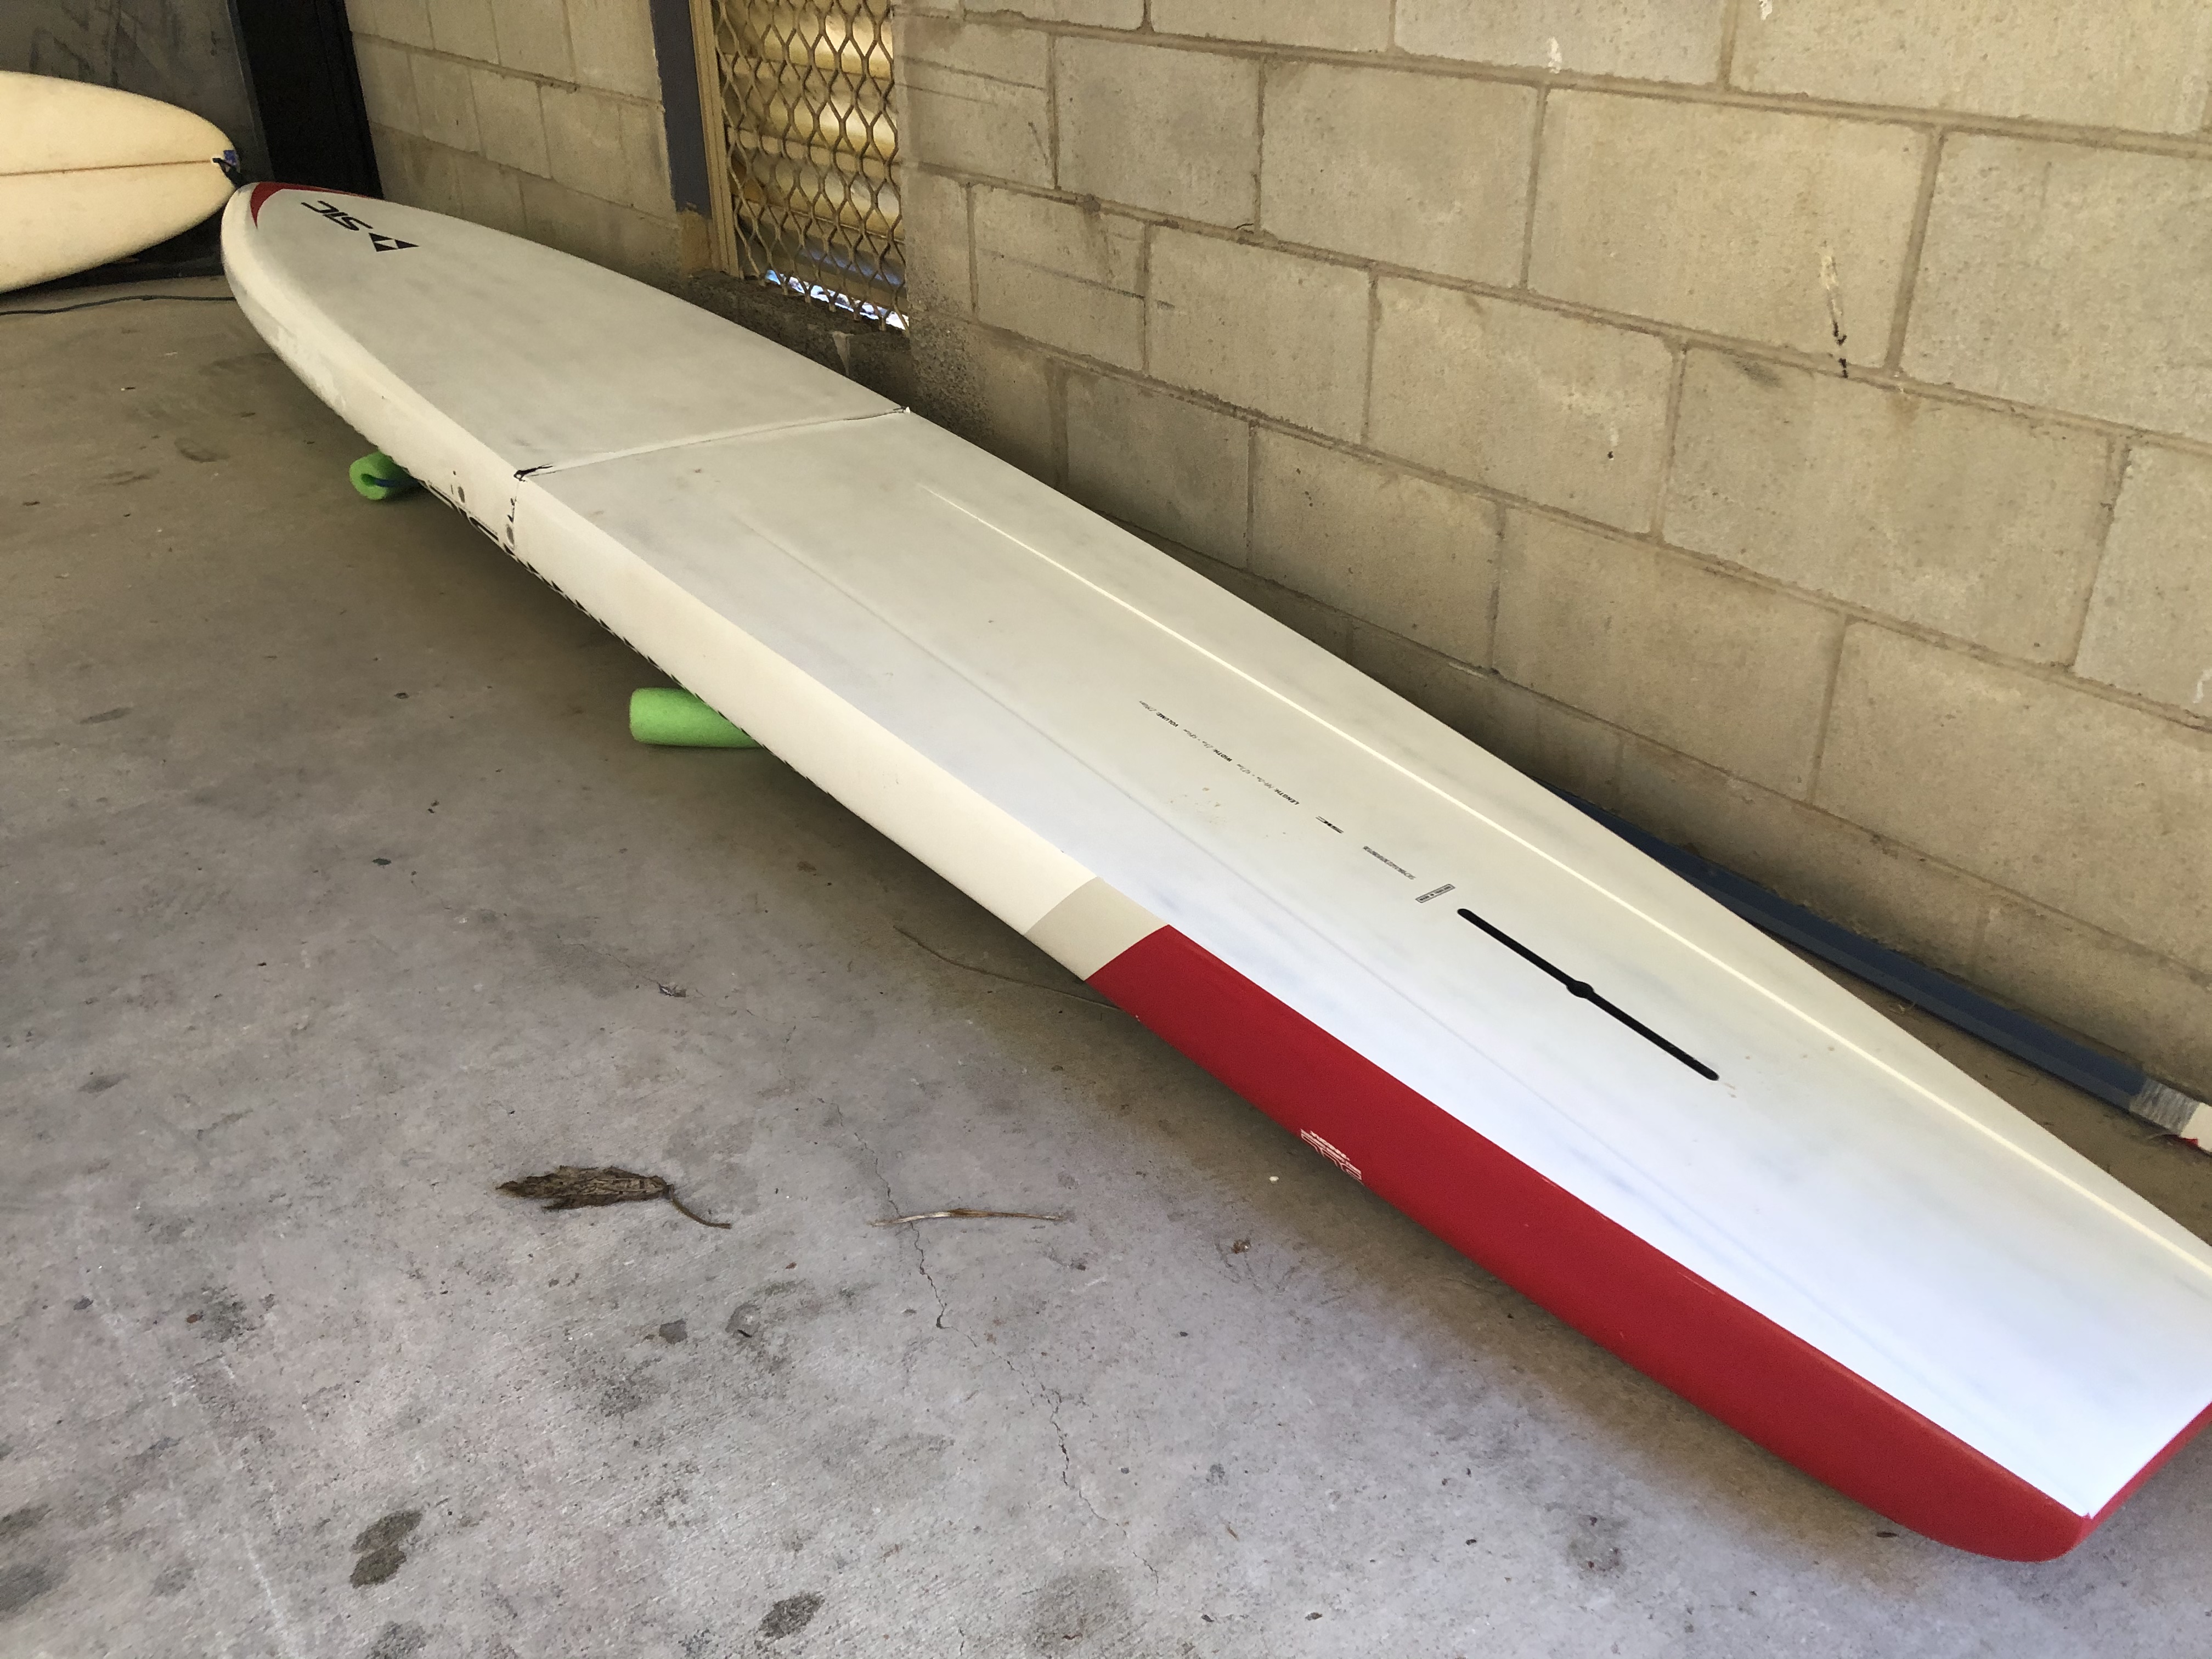
So, set up a work table, with blocks and so on. Chances are the rocker got tweaked, you want to fix that before you do anything else, which will take some doing. I would put it bottom up, put a sort of fulcrum under it, weight the nose and tail to get the rocker as right as you can,block it and strap it in that position. 

Now, as far as I can see, that has ridiculously light styrene foam in it, that’s common. And some of it got squashed when the board bent, you need to make that up. What I would do is get Gorilla Glue in there, it expands, it’s a urethane foam rather than a styrene but that shouldn’t be a problem, they’re compatible. If you have to, drill some small holes and inject it, but try to avoid having the holes in the proverbial ‘dotted line’.

Okay, now, sand it so it’s flat and so you can get a good bond with new cloth and resin… Carefully. If some glass comes away, so be it. If you discover more voids in the foam while you’re doing that, okay, more Gorilla Glue. Likewise, fill any low spots with glue rather than resin plus filler. Let it go off/expand some (wide masking tape over it, improves the density) and sand it all nice.

Now, you have some glassing to do. Quite a lot, actually. So get hold of these guys, they’re the Resin Research distributors for Australia. You’re going to need at least a liter or so of resin. Actually, see what it costs before you do anything, you may decide that you have a coffee table and leave it at that, epoxy is expensive.

AUSTRALIA

Burford Plastics

5 Stewart Rd,

Currumbin Waters

QLD 4223, Australia

Phone: +61 7 5534 3777

Right, no adventures in living room furniture? Okay, what I would do next is lay some cloth on the bottom, 6 or 8 ounce, call it a foot (300mm) wide, centered on the break and well lapped up onto the sides right to the edges of the ‘cockpit’ there. Laminate that, squeegee well for lightness, follow it with an 18" (500mm) band that overlaps evenly front and back also squeegeed well. You want a narrower band under the wider band so you don’t get any abrupt changes in strength and stiffness, those are an invitation for new breaks right at the transition.

Check the directions for ‘time between layers’ and such, follow that. Let that cure. This is so the thing isn’t flexy when you do the other side. Using a razor blade, make X cuts in the cloth where your drains are while the resin is still wet, use a throwaway brush or a stick or something to push the cloth into the drains as best you can, don’t worry if it’s not perfect. 

Flip the board over, do the same thing across the top, cockpit floor, sides of the cockpit and around down to the bottom, don’t forget the X cuts in the drain holes and something similar in that whatsit lifting handle in the cockpit there. The overlap of top and bottom is your strength, resistance to buckling, like a box girder or channel iron. When that has cured, pretty it up in the drains and in the cockpit. A Dremel tool or similar is probably your friend there. Fill the weave with a hotcoat equivalent brushed/flowed on like you’d do varnish, let it cure well, sand smooth, paint white, call it a day. 

At least, that’s how I’d go about it. And again, I wouldn’t blame you if you made it a table top. Quite a lot of work and cost involved and you might find another board is the way to go.

hope that’s of use

doc…


Question is;  Does the ding/crack run under the deck pad?  Meaning;  Can you feel anything under the deck pad.  If not;  I would not remove the pad.  Instead I would rout in a 1/4" wide channel in the middle of the board on the bottom.  Install an insert using a 1/4" wood strip.  Five gal. paint sticks work well for this purpose.  Fill with Q-cell and sand.  Cover with two staggered width pieces of 4oz. cloth from one edge of the deck pad to the other, six or eight inches wide.  Feather sand and blend.  Fill any imperfections using “Marine Putty”(white).  Sand, prime and paint with a matching or near match rattle can.  I have patched tons of these Thai and Vietnam Nam boards.  The last thing you want to do is remove the deck pad.  If you can’t feel anything under the pad; It’s not worth taking it off.  If you do take it off;  Use a heat gun.  The pads that are put on at the factory are notoriously hard to get off.  Sometimes you actually have to sand them off.  Not worth the effort to find no damage.  Usually when these boards crack from the bottom;  The deck stays intact.

Doc, you’re a total legend. Thank you so much for the detailed, step by step, response. You’ve given me the confidence to get this done. It’s defo worth attempting, even if then used as a flat water board. Which would be a shame, as with the tail shape, it’s the nicest 14’ race board I’ve ever surfed, if I’m allowed to say a race SUP surfs well.

As the top of the rails are intact, just flexed enough to chop off some paint, the rocker line is pretty spot on. Hopefully the rails, once sanded of all damaged material, will still hold the board in it’s true rocker line. 

If I may, a couple of questions…

I have some carbon cloth. Would you recommend maybe a strip of glass, then carbon overlapping the edges of glass by an inch, then the 300 and 500mm glass? I could just keep the carbon to the underside, avoiding the rails. Then the 300 and 500mm over lapping the rails from deck and underside would mean 4 layers of glass over the rails??? I really don’t mind gaining weight as this board weights about 8-9kg. Very light. Will sacrifice that for strength, happily.

Should I cut the glass with a curvature to avoid any straight lines, to avoid stress points? 

I understand gorilla glue needs moisture to ‘go off’. Would be okay to lightly spray the foam with water before laying the gorilla glue?

Thanks again, for all of the help.

Best regards,

Jon

McDing, thanks so much for adding your expertise.

I llike the idea of the 5 gallon paint stick as an insert. Would you just lay this in place then glue with the resin and filler? Glass on top of that?

I don’t feel any damage under the deckpad, and as I mentioned the rocker line is intact. It would be nice to not have to take off the deck pad. 

Thanks again,

Jon

Hi Jon,

Legend, not so much, more like a nasty rumor. In any event- 

Now, I know little or nothing about race SUPs, my experience in that area is mostly competition paddleboards, but much of a muchness - So:

Do block the board into position on some sort of surface or straight line jig while you work on it. When I saw that buckled bottom glass I suspected the rocker might be compromised some and you don’t want to let that slip any. If you’re just using a stand that supports it in two places, well, if things shift you’ll never notice until it’s too late. 

Now- your questions:

I have some carbon cloth. Would you recommend maybe a strip of glass, then carbon overlapping the edges of glass by an inch, then the 300 and 500mm glass? I could just keep the carbon to the underside, avoiding the rails. Then the 300 and 500mm over lapping the rails from deck and underside would mean 4 layers of glass over the rails??? I really don’t mind gaining weight as this board weights about 8-9kg. Very light. Will sacrifice that for strength, happily.

Absolutely. Good plan. Just bear in mind that the strength of carbon and glass fibers is in tension rather than compression, compression strength is the resin, so that going well up the rails with the glass is what will give you your stiffness back. Gah, sounds like a Viagra ad. Getting the carbon around tight curves or corners, probably not worth the tradeoffs. 

Also, the trend towards ultra light foam and glassing is, I think, probably a real good thing …for board sales, not so much for longevity. Adding a kilo, if that, in your repair, well, it makes no noticable difference to how the board works but a lot of difference to how it holds up. 

Should I cut the glass with a curvature to avoid any straight lines, to avoid stress points? 

Yes, good thinking. What you are trying to do is bring back the strength without making any abrupt hard spots in the flex of the board. Gradual transitions. 

The way I explain it to people is, well, think about a three piece fishing rod. If you took out the center section and replaced it with a very strong inflexible steel tube, it would break at the ends of the steel section, at that hard transition. A buddy of mine fixed his broken board a few times, it kept breaking at the ends of the glass he added. Staggering the edges of the glass and curving it ( or feathering it by sanding) or a diamond-type edge, you get the picture,  makes that transition more gradual.  

Well spotted, that man. 

I understand gorilla glue needs moisture to ‘go off’. Would be okay to lightly spray the foam with water before laying the gorilla glue?

Again, well spotted. It doesn’t take much, something like a plant mister or a perfume sprayer is the way to go. 

That help any?

doc…

Yes I would avoid removing the pad if no damage is detected.  The deck usually stays intact.  The insert is set down in the board like a short stringer.  Set it deep enough that it is below the surface.  1/8 or 1/4 ".  I use a Q-cell slurry and put enough in the slot that it will fill the slot and the extra can be sanded flat and touched up.  Pinholes etc.

Massive help thanks doc!


In my mind I’m thinking it’d be beneficial to fair out each edge of glass carbon, again to avoid hard stress lines, bit of course this can’t be done without letting each layer dry so it can be sanded.

am I correct in thinking I should forget about this and lay all the glass at once and just sand out the job once it’s all set?

I am thinking

  • remove all damaged material and sand, fair out edges for a hopefull kind of scarf joint 

  • apply gorilla glue to replace lost foam then sand to make it a flat surface for glassing

  • sheet of glass wrapping the rails up to the deck pad just 1 inch wider than the damaged ‘channel’

  • sheet of carbon just along the length of the underside, extending 1 inch beyond the edge of the glass layer. Sandwich power

  • 300mm sheet of glass wrapping the rails

  • 500mm sheet of glass wrapping the rails

  • sand

  • hot coat to ‘fill in the weave’

  • sand, auto spray paint, clear coat

Does that sound like any okay plan. Please make any corrections you see. Massively appreciated.

Happy new year

Jon


Sorry guys, couple more questions.

As I’m really trying to keep costs down, would be okay to use fibreglass from the local store, which doesn’t mention whether it’s E or S, so surely it’s E? Perhaps as it’s E I could lay one extra layer? Additional weight to this board is really a non issue. 

This way I save on the extra cost of S cloth, and the $15 shipping.

cheers

Jon