yet another fin thread

After looking thru numerous thread on fins, I have been inspired by the unreal work you all have posted.

I am getting ready to lay up some fins and have a few questions that I could not find answered in previous threads…

I want to make some glass fins to fit the Future boxes in my boards and a couple of boards that are not shaped yet.

Since the boxes go in flat in the board, any cant has to be built into the fins. I am considering visiting a sheet metal shop to get them to fab a couple of panels (stainless steel or aluminum?) with edges bent to 4 and 6 degrees, perhaps more. This should allow me to lay up some glass and have the cant built in before I start foiling.

Since I will use RR epoxy, I figured I need to cover the metal with some plastic wrap to prevent a disaster.

It also seems feasable to roll a panel to enable the fabrication of fins with a curve to them in addition to the cant.

Any comments on these ideas?

Looks like the future fins are about 1/4" think. How many layers of 6oz glass will I need to make that up?

Thanks in advance for any help.

Not sure about epoxy resin, but poly never sticks to baking paper. From memory i did 40 layers of 6oz, and ended up with just over 6mm, or 1/4'', however, when i'd done the last layer, i added some more baking paper, and sat a 2' x 2' piece of flooring timber on the whole panel, which may have compressed it down. Made it nice and flat BTW.


Im sure ben chipper did something similar to the angled panel you're thinking of. Should work. THe rolled panel may be trickier.


Hope it helps.

Epoxy doesn't stick to wax paper either. It soaks in good too. Good luck, and don't forget to take pictures.

Clean the metal surface up as best you can and get some demolding wax.

Wax on, wax off....several times. Should come off no problem, and no unexpected possibilty of creases or wrinkles from paper.

Thanks Greg-

I have some pva mold release wax, I was thinking about it for this project.

Would you recommend Stainless Steel or aluminum for the plate material, or does it matter?


Hey bartt,  here's another way to skin the fin base cat that I've been using successfully for a while.  It's basically a jig with an adjustable cant arm, and some silicone fin base mold inserts.  Those in the photo are 1/2" and 3/4" Future molds. I set the fin cant,  brush some PVA into the mold, pour my resin/milled fiber in there, set the fins in and wait. Pop them out and they're pretty much ready to go.  Really simple to make the jig and molds from hardware store supplies and they last forever if you don't forget to use the mold release (don't ask how I know). 

fin base mold

Let me know if you're interested in trying it out and I'll post some DIY details. 

Oh yeah, from my experience it takes about 48-54 layers of well compressed 6oz glass to get a solid 1/4" from.   

Very ingenious! Please post up details. This opens up the possibility of using core materials when I had not considered it before.

Thanks…

First I cut the patterns in wood and paint them with a couple layers of latex paint.  Futures are really easy - 1/4" thick, 4 1/2" long, 3/4' & 1/2" tall.  Sand a slight taper in the the front to fit in the box, then cut the notches. 


Next, I use superglue to attach the pattern (bottom up) to a base and build a box around it, leaving a 3/8" gap on all sides.  A 1" deep box works fine with any size base.  (You'll notice I switched to photos of LokBox molds - my Futures are tied up right now, but same process.)


Once the mold box is set up I give the pattern and inside of the box a good coat of PVA mold release. Butcher's wax works too.  Once the mold release is dry (30 sec with a hair dryer) I use 100% silicone in a caulk gun to fill the void around the pattern.  Pick a starting point in the gap and circle around the pattern, pumping the silicone in without lifting the tip of the tube from the fill.  Let the silicone rise to just above the mold box level and fill in the dry strip on top of the pattern last.  The idea is to not make any bubbles against the pattern facets.  Squeegee the excess silicone flush with the top of the mold box.  It is easier but more expensive to use castable RTV rubber for this step. 


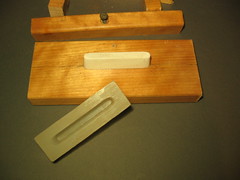
Let the mold sit for 24-36 hours before trying to remove the pattern.  If you remove the pattern before the center of the silicone gels, you could warp the mold, and the resulting casting will be warped.  Sometimes the mold will peel right off of the pattern and out of the box.  Sometimes the box has to be taken apart - that's why I only put a couple screws in it, and the end plugs are just pressure-fit.  Also why the pattern is super glued to the base - easy to 'snap' off and salvage if there is a problem. Here's a shot of the silicone mold removed cleanly from the pattern. 


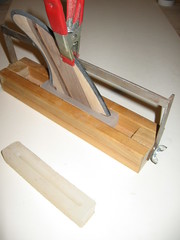
Once you've got the molds, the casting jig is easy to make.  It is basically an elongated mold box (for casting two molds at once) with permanent end blocks and a swinging arm.  I build mine out of 3/4" wood, and the arm out of 1/2" bar stock from Home Depot.  If you don't weld, the arm can be made from wood, plastic etc. as long as it is rigid and won't flex in the center of the span. 

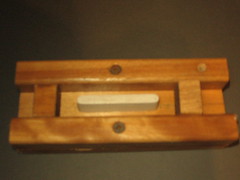
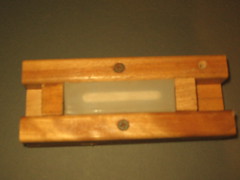
A closer shot - just a threaded insert in both ends of the jig and a wingnut bolt to fit . Notice that the pivot is not centered on the mold groove in the jig.  That is because the cant adjustment arm is not touching the center of the fin, but an outside plane of the fin.  In other words, off-set the pivot point 1/8" from center, and use a cant template to double check your angles.  Once it's set, you can make index marks on the jig, or use stop pins. 


Now, when I cast the base, I'm really just casting filler for the existing base on my wood fins.  I keep as much of the existing fin on as possible.  I only really cast about 1/8" or less of epoxy (w/ milled glass fiber) around the existing wood base, setting the cant, and making the fit for the fin box.  So, adjust the cant on the jig and tighten down the arm.  Dry fit your fins in the mold, and make sure they're pointing in the right direction relative to the bases.  Mask the fins with tape from the top of the mold to 3/4" up.  Fill your molds about 3/4 full with resin/pigment/milled fiber mix.  Put your fins in to the molds, and allow the resin to overflow slightly.  DO NOT clean up all of the overflow.  As the resin sets, it will shrink, and the overflow will compensate for the shrinkage in the base.  Any excess can be trimmed and sanded after the base is removed. 


After casting a few, you get a pretty good idea of how much resin is just enough, and the castings come out pretty clean with little finishing to be done.  If your pattern had fit perfectly in your fin box, the cast base should fit the same.  Here's a few measurements of the components:


There are variations that I've come up with since making the first casting jigs, but they work so well and are not going to be retired anytime soon . . .


Feel free to use what I've got here and let me know if you've got any questions.  Good Luck!

Camplus

Awesome explanation and pictures, i have some balsa fins that i would like to do this to so cheers for the ideas!

It is much easier to cast on a little cant at the end, than it is to lay it up into the stack.

I did mine in flat layups. At the end, I would sand an angle into the base. I made a plastic mold of the fin base (you could use an old finbox if you are clever). I would place the fin in the box, set the angle, pour a small volume of chopped glass and resin (it is a pretty small volume), and let sit. Once it cured, the cant was in.

One of the fin shops will use a THICKER layup, and grind the fin base to cant at the end. Their method is even easier, but you need special equipment to grind the tab cleanly. 

Also, a quarter inch layup is pretty close to 25 layers of 6 ounce if you roll it well every 2-3 layers. If you use 40 layers you will have fin tabs thick enough for a center fin box (tab width 0.350")

Good luck, hth.


[quote="$1"]

After looking thru numerous thread on fins, I have been inspired by the unreal work you all have posted.

I am getting ready to lay up some fins and have a few questions that I could not find answered in previous threads..

I want to make some glass fins to fit the Future boxes in my boards and a couple of boards that are not shaped yet.

Since the boxes go in flat in the board, any cant has to be built into the fins. I am considering visiting a sheet metal shop to get them to fab a couple of panels (stainless steel or aluminum?) with edges bent to 4 and 6 degrees, perhaps more. This should allow me to lay up some glass and have the cant built in before I start foiling.

Since I will use RR epoxy, I figured I need to cover the metal with some plastic wrap to prevent a disaster.

It also seems feasable to roll a panel to enable the fabrication of fins with a curve to them in addition to the cant.

Any comments on these ideas?

Looks like the future fins are about 1/4" think. How many layers of 6oz glass will I need to make that up?

Thanks in advance for any help.

[/quote]


Hi Bartt, Nice stuff  my friend. Future Fins are .275 thickness, 1/4" thickness will give you to much side play. Mahalo,Larry

Good call from Probox.  If you're making the silicone molds, 1/4" raw wood patterns are the starting point - they bulk up just that extra bit with the paint for a snug fit in the boxes.   Also, Blakestah is right on about using the actual fin box as a mold.  If you're going that route though, don't forget to fill the screw hole with wax or oil clay.  Don't freak out and grind the fin box off the fin if it seems like the cast base won't come out after the resin hardens - stick the box  end in a bowl of ice for 30 min or so then try removing the fin.  Usually works like magic. 

It looks like the blank layup #'s are all over the place, which indicates, that a little hands-on will show what works for you.  I've layed mine up 24 layers at a time under several hundered (i guess) PSI in a large wood vise.  Probably why it takes so many layers for me to get 1/4". On the other hand, I think it was here on Sways that someone had layed-up 4-6 layers of 24oz woven roving for a single fin blank . . .

Man, this is why I love Sway's!  Like a ceaseless brain storm in here.

[quote="$1"]

Good call from Probox.  If you're making the silicone molds, 1/4" raw wood patterns are the starting point - they bulk up just that extra bit with the paint for a snug fit in the boxes.   Also, Blakestah is right on about using the actual fin box as a mold.  If you're going that route though, don't forget to fill the screw hole with wax or oil clay.  Don't freak out and grind the fin box off the fin if it seems like the cast base won't come out after the resin hardens - stick the box  end in a bowl of ice for 30 min or so then try removing the fin.  Usually works like magic. 

It looks like the blank layup #'s are all over the place, which indicates, that a little hands-on will show what works for you.  I've layed mine up 24 layers at a time under several hundered (i guess) PSI in a large wood vise.  Probably why it takes so many layers for me to get 1/4". On the other hand, I think it was here on Sways that someone had layed-up 4-6 layers of 24oz woven roving for a single fin blank . . .

Man, this is why I love Sway's!  Like a ceaseless brain storm in here.

[/quote]

Thanks camplus, Nice fins my friend. Mahalo,Larry

Thank you Larry.  That's a real compliment coming from you, considering whenever I'm lurking on Sways for some 'finspiration' I find it on one of your threads.  Not sure how many times I've pointed out your foiling thread after selling a fin blank to someone! Good stuff.  

[quote="$1"]

Thank you Larry.  That's a real compliment coming from you, considering whenever I'm lurking on Sways for some 'finspiration' I find it on one of your threads.  Not sure how many times I've pointed out your foiling thread after selling a fin blank to someone! Good stuff.  

[/quote]

Thanks for the kind words. The more people know about their fins, the easier my job is to sell fins. Because people would be able to read between the lines from my competition, which by the way your grain angle is perfect on your lay-ups. Keep up the good work my friend. Mahalo,Larry 

Timely thread guys. Camplus, thanks for the detailed instructions on the mold.

I’ve got 3 sets of wood fins already foiled and stub tabs on them, but I’ve been putting off finishing them because I haven’t quite wrapped my head around the best way to mold on Futures bases to them. You writeup is a great start. Cheap and easy too. I like the fact that you’ve got the cant adjustment on there too. Allows for flexibility and minor tweaking.

Thanks for all the great replies to my humble request.

This is why I like Sways also, there is a lot of brain power here.

Camplus - brilliant solution and a pro execution. My compliments.

Larry - Thanks for joining in, I am humbled.

If the weather will warm up a little here, perhaps I can try a couple of experiments to see what works for me…

[quote="$1"]

Thanks for all the great replies to my humble request.

This is why I like Sways also, there is a lot of brain power here.

Camplus - brilliant solution and a pro execution. My compliments.

Larry - Thanks for joining in, I am humbled.

If the weather will warm up a little here, perhaps I can try a couple of experiments to see what works for me..

[/quote]

Hi Bartt, My pleasure for a Swaylockian Bro thanks for having me my friend. Mahalo, Larry

HOW did I miss this thread ???


  GREAT stuff guys !!


  cheers


  ben