Anybody have any experience blowing up an image of a board you’d really like to make from a standard website sized picture, into an image big enough to craft a template from? Tech tools involved? So far Ive learned alot by making copies of professionally made boards I own, but Id like to expand my template library a bit.
Sure, I do it all the time. I just study the picture, draw the desired shape to scale (1 inch on paper = 1 foot on the real board) on grid paper with 1/4" squares, then draw a 3" grid on masonite, reproduce the drawing at full size - I used to bend sticks and fishing poles etc, but I finally realized freehand will get you close enough, leave a little excess and the fine tuning is done with sanding block after the template is cut out.
Basically you end up with the shape you want to make, based on the image of the board you like, rather than an exact copy (I prefer to build the board as I see it in my mind’s eye).
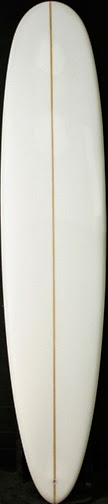
Here’s an example. Ace posted some pics of this awesome looking glider, 9-6, I love Ace’s work, and this board especially. Ace not only talks the talk, but he walks the walk and generously posts the pics to prove it, gotta love him for that.
I had a blank for an 8-4. I studied Ace’s pictures, template, rails, bottom, anything I could glean from the pics. Then I drew my sketch on graph paper, scaled it up on masonite, and cut my template. Shaped it using my mental notes from his pics, and a few of my own little tweaks. Not an exact replica, but currently my favorite board.
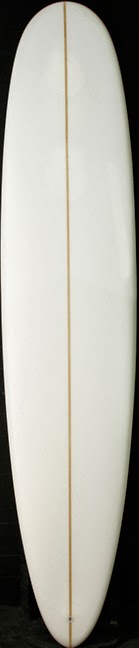
Here’s another example, and the first all foam board I ever made. I studied pics of longboards, but especially Cooperfish longboards, as I really like Gene’s work.
I drew my template as per above, not an exact copy, but my interpretation. An internet friend in Florida gave me some pointers on the rails and v-bottom in the tail. I love this board, and a few others who have ridden have loved it too.

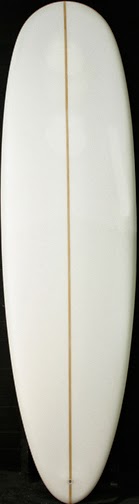
A third example is this 7-6 square tail I made, another good performing shape. I liked the plan shape of Randy Stoker’s boards. I drew it out, and made my template. But my blank wouldn’t accomodate the width, especially in the tail, so I had to pull it in a little. The shape itself is a little different, I have more dome in my deck, and thinner rails, tail, and nose. But you can clearly see the inspiration for my template.
A 2 dimensional picture of a board is not going to lead to an accurate template. There is no way to account for the rocker if you trace the outline from a picture.
Mako, that’s a well thought out, and to the point response!
True… but, it will get you close. I have done it once and was happy with the result
Without getting in to the morality of it all, it’s a fact that it’s pretty easy to save most internet images to your hard drive, print, and then enlarge/reduce via a copy machine to the correct scale size. I.E. 7" image for 7’ actual size.
By plotting several points along the stringer of the image, dimensions can be taken at each position and scaled to the corresponding position on a piece of Masonite. Measure across those points on your scale image and scale dimensions up to the full-size Masonite pattern. A metal ruler with fine gradiations is ideal for measuring the scale image.
A fiberglass rod can be used to connect the dots. That, or with an accumulation of existing templates, use one or more of those to connect the dots. The more template choices you have, the easier it is to connect the dots with them. It’s just a matter of finding the right one and shifting it around until the curves hit the marks.
Mako224 is correct that this method will slightly shorten the outline. It’s usually not much more than an inch or so longer if you follow the actual rocker. Minor adjustments need to be made depending on how close you intend to copy the original. By extending the pattern slightly and maybe taking a few extra strokes with the mini-plane when truing, you’ll be pretty darn close. ‘Eyeball’ close anyway.
This is close to Huck’s method but skips the hand drawing/graph paper part.
Ive seen someone make pretty accurate templates from a bigger boardmaker… from internet images. Then as teh bigger brand boards came in he double checked his templates and was less than 1/4 inch off in the tail and less than 3/8s in the nose. Not great tolerances but from internet art… its pretty impressive.
You need a drawing program like adobe illustrator. There are many out there, and I’m sure there may be something free if you look around.
Open the image in the drawing program then trace it using a curve tool. You may need to make several anchor points to get the curve just right. I try to keep it down to 3. Once the curve is right you can duplicate it to have the complete outline to see if it looks right. Then size it to the proper dimensions, export a PDF and print it at you local kinkos or other printing shop, or import the drawing file into photoshop and cut it into slices that you can print on a standard printer. I use an 11X17 printer. Someone here said you can just print it from Illustrator to regular paper and the program will make the slices. I like to have my slices overlap and I add a reference line to line up each page. It’s not going to be an exact copy, but it will be close to what the image was. The image may not be accurate too, so you can mess with the curves and make your own version. I do that a lot, I’ll take a shape and stretch it or shrink it, change the width, wide point. I have my favorite rockers, so I just go for the outlines I like, but you can also do this with rockers.
Sometimes I take the paper template and make a masonite copy, sometimes I just lay it on the blank and draw it or lately spray paint it on.
One of the things right off is the lens distortion of the camera has on the visual perspective in the image. Here’s a composited image of the bottom and deck of a board photographed from the the same point on a tripod-ed camera. The bottom looks shorter than the deck because it’s rocker is curving away from the camera. Objects visually receding in space appear smaller.

Don’t misimterpret me here the abiity to take an image off a computer, and transfer it to a template is pretty cool; nonetheless it is not the same, and 1/8 or 1/4’’ doesn’t cut it, but its still a place to start. Good templates without any bumps, or dips, and an asthetically pleasing curve is beautiful to my eyes, and probably everyone else; I feel the boards ride better too,
Things change when you blow them up. Templates look different when stored flat than when put on a curved blank. Yeah its just the obvious. Have fun however you make your templates, and check them when there done by bending them, and following the curve with your eyes, and if you see something that shouldn’t be there, fix it.
Its the curves that are important, and with a few measurements and some adjustments with a good template you’ll be suprised how many different boards of your own, you can come up with.
I will assume you have the picture saved on your computer. The higher the resolution the image is the better the end result will be.
If you have Adobe Photoshop (or you can insert the image into a MS Powerpoint slide), crop the picture so that the surfboard shape just touches the sides of the cropped rectangle (the widest points, the tail tip and the nose tip).
First re-size the cropped image’s dimensions with “proportions constrained” feature on (“aspect ratio locked”) to be proportional to the “length” you would like the board to be (e.g. as John Mellor said 7" for 7 feet or 14" for 7’ or 21" for 7’ etc.)
Next, decide what width you want the board to be. Turn off constrained proportions (unlock aspect ratio) and type in a width dimension that is proportional to the width measurement you you want (2" for 2’ etc.) – use the same proportional relationship (ratio) you used for length.
Save and you have a shape that matches your desired dimensions. (The larger you make the image the more pixelated the outline will become).
You can now transfer the image to graph paper or template material as described by the others above. The template shape will have the exact dimensions you want, based on the original shape in the picture.
My $0.02 …
EDIT:
Post a good top or bottom view photo, give the desired length and width dimensions and I will provide a quick sample of this method. BTW the surfboard in the photo needs to aligned in the vertical dimension like atomized’s picture for an easy computer crop. Otherwise, you need to print, crop by hand, then scan and re-size.
I used atomized photo for a quick demonstration (cropping not perfect). Handcropping and re-scanning needed for photos not aligned with vertical axis. All of this can be done mathematically using the original image dimensions multiplied by the proportional change in the desired dimension.
First picture, cropped and image length re-sized to 9" = 9’.
Then proportionally re-sized to 7" for a 7’ board with dimensions proportional to the original 9’ shape, 7" = 7’ (width narrows, Aspect Ratio Locked).
Length re-sized to 7" (7’) but width remains the same as the original 9’ board. (Aspect Ratio Unlocked).
Huck, really nice work man. You make some pretty boards. Good evidence that graph paper and some precision can do the job.
For the rest, thank you for the tips, really appreciate it.
In regards to the 2d image to a blank issue, I think the way Id approached it thus far was a 2d image, when placed on an unrockered blank, I.E. a block of foam, should be accurate. When placed on a rockered blank, there would be a discrepancy. Ive considered this as well when taking templates from shapes I own. If the initial rocker of the blank Im using is different than that of the board Ive templated, there will be a discrepancy. I actually ran through the math involved, had to break out the old scientific calculator ![]() In that scenario, its quite a small difference. That said, I’m still less than 10 boards made and have no intention of ‘leaving the garage’ so to speak, so my desire to copy a shape is just to learn about how these shapes work and what different shapers do. So an exact copy has no real purpose other than as a means of practicing the craft.
In that scenario, its quite a small difference. That said, I’m still less than 10 boards made and have no intention of ‘leaving the garage’ so to speak, so my desire to copy a shape is just to learn about how these shapes work and what different shapers do. So an exact copy has no real purpose other than as a means of practicing the craft.
I do have photo-shop, and GIMP, a free-ware alternative that seems to work well. Just wasnt sure what the steps involved would be for blowing up the image and creating printable slices. Looks like some photoshop tutorials are in my near future.
Really appreciate the thoughtful comments everyone. Thanks!
-S
Hey Stoneburner, thanks for the feedback.
Its a takayama scorpion, I was planning on making a 5’10" by 21.25
This is the largest image Ive found on the web so far, also of a 5’10" (I figured finding the same model would help with the proportions as you blew the image up)
Thanks!
-S
Photoshop or computer re-sizing is not needed if you measure the original photo shape’s dimensions at regular intervals and proportionally plot them on graph paper or template material.
ps - Anyone using BoardCad for this or similar purposes?
Gotta jet right now. But I will do an image re-size for you later today or tomorrow. PM your email address and I will send you an original of the re-sized image (5’10" x 21.25"). Looks like I can just re-size the original photo to get what you want without cropping since it is nicely aligned in the vertical and horizontal axes.
At the risk of getting scorched for saying so, I do it all the time. Depending on image distortion sometimes the widths in the drawing don’t match the dimensions of the boards, at which point I go to paralleling the lines on the image. I would say a certain percentage of the drawings hit the stated numbers dead on, though.
But after I’m done with that I ditch the original image and proceed to find the lengths, curves and widths I like. I’ve never tried to actually copy a board. I just takes bits and pieces. By the time they interact with each other the results are always different than what I started with. Usually way different.
OK I just did a “quick” re-size of the Scorpion: I can give you something a little cleaner later and email it to you.
Original image re-sized proportionally to 5’10" (Proportions Constrained, Aspect Ratio Locked) width as in photo and a bit narrower than 21.25", 2" = 1’
Image re-sized to 5’10" with width changed to 21.25" (Proportions not Constrained, Aspect Ratio Unlocked), 2" = 1’

