I put this together off-forum a few weeks ago for SurferO using a Lis Fish (Kinstle, 1977) to illustrate. Perhaps a few members/visitors might be interested. Let us see what happens.
http://bgboard.blogspot.com/2016/01/re-sizing-full-size-surfboard-templa...
To re-size a full-size template, first divide desired length or width by original template length or width, respectively.
[Dimensions shown in all figures below are those of the original figure (Kinstle, 1977) and have not been re-labeled to show the increases or decreases discussed.]
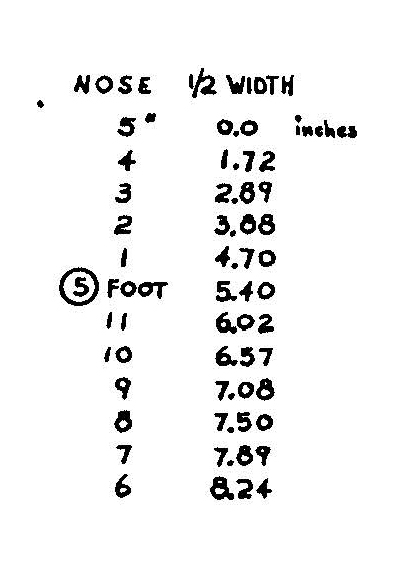
In this example, the objective is to increase template/surfboard width from 21" to 23". Divide 23" by 21". This gives you 1.095. The measured widths of the Lis Fish template below (Figure 1) are at 12" intervals. Now multiply each of these widths by 1.095 and you have the new widths for the same 12" intervals. To decrease template width from 21" to 19", divide 19" by 21". This gives you 0.905. Now multiply the original widths by 0.905 and you have the new narrower widths for each of the original 12" intervals. For either, plot and connect these new width points with a smooth, continuous curve. You could use the old template or a flexible strip/batten to draw the curved outline.
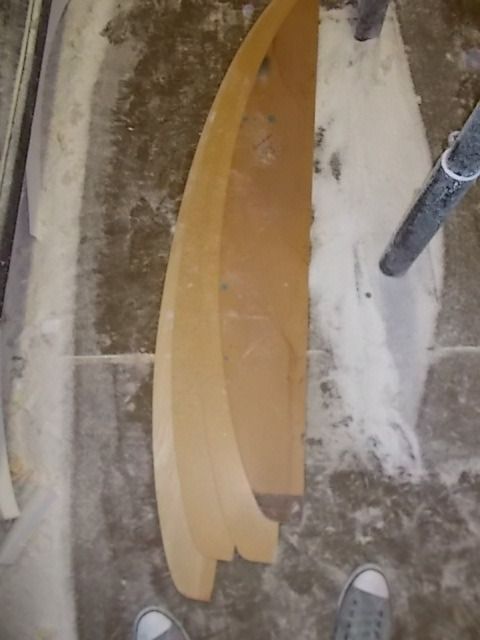
Fig 1. Lis Fish template: original width (21 inches), wider (23 inches) and narrower (19 inches). All three are the same length.
To increase template length from 65" to 74", divide the new length (74”) by the original template length (65"), 74/65 = 1.138. The original template widths will now be placed at 13.66" intervals (1.138 x 12") instead of the original 12" intervals. To decrease length to 56", divide the new length by the original length (56/65 = 0.862). Now place the old template widths at 10.34" intervals (0.862 x 12") instead of the original 12" intervals. Again, plot the points and connect them with a smooth, continuous curve (Figure 2).
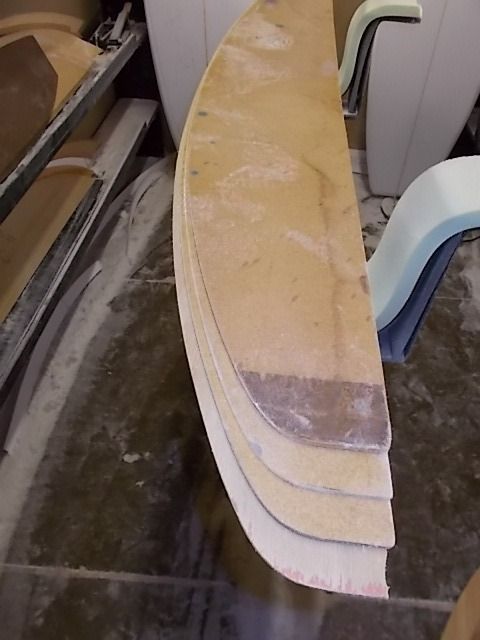
Fig 2. Lis Fish template: original length (65-inch), longer (74-inch) and shorter (56-inch). All three are the same width.
To improve nose and tail shape resolution, you can measure template widths at 1-inch intervals for several inches (Figure 3) -- starting measurements from the template tips (nose and tail). Similarly, rather than using 12-inch intervals to measure the original template widths, you could use 2- to 3-inch intervals. Whatever length interval suits you. The closer together the width measurements are, the better the shape resolution will be overall. These new intervals will be increased or reduced to increase or decrease template dimensions using the same method described above.
Figure 3. Steve Lis Fish
Kinstle, J.F. 1977. Surfboard Design and Construction, p. 61. Published by Natural High Express Publishing, Long Beach, CA.
Makes perfect sense to me. The modified diagrams look like everything works. A far cry from one of the local shop rats who once told me, "DUDE... if you go longer, you gotta go narrower" or some such crap when I asked him about enlarging a shape proportionally.
Copy template onto blueprint paper. Take paper to local blueprint shop. Have them enlarge the sheet by your desired percentage.
Many ways to do it Mako. I will assume blueprint shops can enlarge in a single dimension (x or y axis).
I live in a rural town., population 6,250. Cannot buy blueprint paper in a 30-50 mile radius. We have no blueprint shop. We have a super WalMart but no office supply store. But the local newspaper can do a little printing. (I am being serious).
I frequently use computers to stretch and/or widen diagrams and graphics for quick comparisons. Allows me to see/view the many possible combinations of length and width for any given template/shape. Also facilitates effective communication of larger concepts, using figures and the written word. I retired last year and still have limited access to a banner printer at a university research complex. But I still draw templates by hand (using basic math).
This is an easy method that can be done with "simple" math -- by hand -- using a framing square, a pencil and a batten or a large curve. It can be done on the floor of a porch, kitchen or garage. You do not need a calculator to do the math.
One good template can be used to generate many different combinations of length and width. By varying one dimension at a time, it is fairly easy to evaluate the effect that changing one variable has on a shape's performance.
Swaylocks Surfboard Design Forum: thoughts & theories ... practical & theoretical
RAIL PROFILE http://bgboard.blogspot.com/2014/03/march-82014-afterr-seeing-recent.html
Move to San Diego. Borrow old school fish from friend /co worker or next door neighbor.... Make sure the fish you borrow is a top name brand. Rip a template...you're not the first guy to do it..... forget about the math...now you have a real template made from a top name brand.....ha ha......I own a REAL fish template...... ..........and................................................................................................................................................................................
Old news but worth repeating. Master shaper Greg Loehr taught me that for every inch in length adjusted you should adjust width by 1/8 inch. You otherwise end up with a poorly proportioned shape when you just enlarge or shrink based on percentage. You can usually adjust up to 6 inches either way using your base template.
All the best
Personally I'm always ready to learn, although I do not always like being taught. - Winston Churchill
For a directly proportional re-size, the new dimensions must vary precisely. The aspect ratio must be locked. Width changes by the same proportion as length. With aspect ratio locked, a 20" x 72" shape that is re-sized to be directly proportional increases to 21.66" x 78" (figures below). This represents a 0.277" increase of the maximum width for every 1.0" increase in length.
However, length and width can be re-sized independently of one another to create a desired combination of length and width (aspect ratio unlocked). If you plan to change both width and length for the new template, it is easier to calculate and plot the new length intervals first.
EDIT: This post was re-worded to communicate the concepts intended. The original post was poorly worded and incorrect.
Swaylocks Surfboard Design Forum: thoughts & theories ... practical & theoretical
RAIL PROFILE http://bgboard.blogspot.com/2014/03/march-82014-afterr-seeing-recent.html
The '1/8" width for every 1" length' rule-of-thumb helps to maintain the same outline curve or "proportion". Notice the difference in outline curves when only width or length is change. The '1/8" rule' will give you a width target, when desired length is known, but it doesn't define the curve between the nose and the wide-point, or the tail and the wide-point. Neither answer is complete. In the end, it usually comes down to an approximation, derived from either a judicious application of an existing template, or a keen eye and a sharp pencil.
Another consideration when enlarging an existing shape is how to extrapolate rocker. Aku adds 1/32"-1/16" at both ends for every 1" of length added. Thickness flow or what some call "foil" is also to be considered. Aku will automatically change rocker, thickness, both or neither depending upon the designer's choice.
When hand-shaping in the bay, I have a general idea of where I want the "adjusted" end-point rocker to fall as I increase length, and I just "eye-ball it" from there. Likewise, with thickness I have a 12" up-from-tail and 12" down-from-nose number I want to match up with "thickest point" number. Using those number from the exisitng board works well enough, unless I decide to increase thickness. In that case depending upon the new boards length and the amount of thikness added (or subtracted) I might adjust the end numbers a little. Its a ballpark reference, and here again, how it "looks" determines the final number.
Yep. Well said. All approximation. In the end you have to please the eye.
All the best
Personally I'm always ready to learn, although I do not always like being taught. - Winston Churchill
Somebody might specifically want a 5'10" Takayama Scorpion shape that is 23" or 19.25" wide rather than 21.25" wide. The proportional math method maintains the basic shape when varying one dimension while the other dimension (width or length) remains fixed. Curve "steepness/flatness" (slope) of the planshape outline is definitely altered by changing one dimension while the other remains fixed. But the curve's slope changes are still in the same position relative to the original shape/template. It is a good way to see the effect that varying one dimension has on performance, while the other dimensions remain fixed.
"If" you want to maintain the same proportions for the rocker curve -- tangent angles relative to given points; curve slope (steepness/flatness) -- you have to multiply the rocker heights by the same proportion that the length changes. Otherwise, the rocker curve slope becomes steeper or flatter; that is, bottom angle relative to the water surface changes and is different. But, maintaining the same rocker curve slope may not be well suited for the new length.
Swaylocks Surfboard Design Forum: thoughts & theories ... practical & theoretical
RAIL PROFILE http://bgboard.blogspot.com/2014/03/march-82014-afterr-seeing-recent.html
""If" you want to maintain the same rocker curve -- tangent angles relative to given points; curve slope (steepness/flatness) -- you have to multiply the rocker heights by the same proportion the the length changes. Otherwise the rocker curve slope become steeper or flatter. But, maintaining the same rocker curve shape may not be well suited for the new length."
Absolutely.
Looks like you were responding John while I was editing. The content/meaning was not changed -- just an added bit for clarification.
Sorry about that...
Swaylocks Surfboard Design Forum: thoughts & theories ... practical & theoretical
RAIL PROFILE http://bgboard.blogspot.com/2014/03/march-82014-afterr-seeing-recent.html
All good. Useful info and insights from all, lots of ways to manipulate shapes up, down, sideways, etc etc. These are tools we should have in our computer, the one between our ears, to pull up when we need them. Good thread.
When I worked as a ghostshaper, pre-CNC days, we all had multiple tempalates of each model.
1/4" of centre width per every 2" in length. So Greg's 1/8" rule is viable.
Since I handshape all my boards, I route the outlines.
Have several templates for each model.
Cut them on bandsaw and clean 'em up with my beltsander.
10-15 min. to make 'em perfect.
Same math works.
As the length increases the nose and tail widen as well. Just not the solid 1/4" at centre.
Same outline, just scaled up or down.
Works perfect.
That's how you end up with 200+ outline templates.
Barry Snyder
Surfboards made by hand. Not machine.
http://barrysnyderdesigns.com
Instagram @barrysnyderdesigns
Barry, when you are making a new template (bigger/smaller) for the same model do you just use the template that you already have to connect the dots and create the curve of the new template?
Yep.
I just draw length, New centre width, either + or - , Same widths at nose and tail.
The nose and tail widths change slightly.
I usually make templates 4" longer or shorter.
So @ 4" the width changes 1/2".
Nose and tail change naturally as I follow the same curve.
Barry Snyder
Surfboards made by hand. Not machine.
http://barrysnyderdesigns.com
Instagram @barrysnyderdesigns
Cool sounds good. Thanks Barry!
No way you all sck. whet i dew is i git graf papera jest make bigger squates. so one little square equals a inch. i did my fis my 5.0 fish n skaled it up to a7.0fish. itendedup being7.0 bye 28 wide. itseuf jest fine for me.
...math works at a some point for this application; it is like BarrySnyder says.
-a fish should be less than 6; if not is not a fish, does not have that "fishness" in the design; would be only a big floaty board with a swallow tail. I remember a Rusty model long time ago; a dog.
Connect the dots
or do the math...
Wi Fre Fi.jpg
I would rather be someone's shot of whiskey, than everyone's cup of tea.
www.mattysurfboards.com
My password/pin is pi. (π the number)
3.14159265358979323846264338327950288419716939937510...
Swaylocks Surfboard Design Forum: thoughts & theories ... practical & theoretical
RAIL PROFILE http://bgboard.blogspot.com/2014/03/march-82014-afterr-seeing-recent.html
When widths were increased by 1/4" for every 2.0" of length from 72" to 78", widths ranged from 20"- 20.75" (basic math based). I got this overlay:
.
Swaylocks Surfboard Design Forum: thoughts & theories ... practical & theoretical
RAIL PROFILE http://bgboard.blogspot.com/2014/03/march-82014-afterr-seeing-recent.html
Eh,
I may joke
But in all seriousness
Just went thru this dilemma!
Stretching a template.
As sadly follows
Two build sheets and basic photos of the product.
Came down to experience and eyeball.
BTW, when I was a lad, it was numbers and battens.
Good worthy templates came at a price.
If it were simple, well just
Rejoice in the craft…
bs 1062 1.jpg
bs 1062 2.jpg
BIG & LIT'L SIS.jpg
I would rather be someone's shot of whiskey, than everyone's cup of tea.
www.mattysurfboards.com
No offense intended. A template re-size is only as good as the original template, the cutting of the new template and the final template sanding.
Sometimes computers draw and print curves that I cannot draw nearly as clean or smooth.
Sometimes I let the computer make the curve, others I do not.
Swaylocks Surfboard Design Forum: thoughts & theories ... practical & theoretical
RAIL PROFILE http://bgboard.blogspot.com/2014/03/march-82014-afterr-seeing-recent.html
Scaling a board up or down is always going to be a compromise, there is no way that every feature gets scaled equally, otherwise fins and fin boxes would have to come in infinite gradations, that would be silly! Rocker, plan shape, curves, fin placement, it all gets fudged to make it work. Mathematical proportions are a starting point, and valuable. But aesthetics, common sense, intuition, and experience all have to factor in too. When I scale a board up or down, I just draw it up new from scratch, but its different if you had a customer who wanted "this specific board" but a different size. Kudos to guys like Mattwho and Barry Snyder who work this kind of magic.
double post.
Swaylocks Surfboard Design Forum: thoughts & theories ... practical & theoretical
RAIL PROFILE http://bgboard.blogspot.com/2014/03/march-82014-afterr-seeing-recent.html
There are many ways to get the job done.
I suspect you used coordinate geometry to paint that surf mural on the side of a house.
Aesthetics are as much a part of generating computer shapes as for math based and hand drawn shapes. I find all useful .
This thread is about a simple method to adjust length and/or width of a template using basic math.
Accept. Reject. It does not affect me...
Swaylocks Surfboard Design Forum: thoughts & theories ... practical & theoretical
RAIL PROFILE http://bgboard.blogspot.com/2014/03/march-82014-afterr-seeing-recent.html
I see it is quite a while ago this thread was alive, but i was wondering if you could post the rest of the details, spesifically those about the rail and rocker outline, on Steve Lis' original scetch?
Start on page 62 at this link:
http://www.hollowsurfboards.com/documents/38-SurfboardDesignandConstruct...
Swaylocks Surfboard Design Forum: thoughts & theories ... practical & theoretical
RAIL PROFILE http://bgboard.blogspot.com/2014/03/march-82014-afterr-seeing-recent.html
This thread was one of the true "nuggets" of golden information here on Swaylocks. And mucho Kudos to Mr. Stoneburner and others for their contribution. Stoneburner's Math helped me greatly in another thread as well when I attempted to put my Spin on a "Moonbeam" that required resizing. This is where someone who has the analytical mind and can do the Math can contribute greatly to something as simple as shaping a surfboard. High regard Stoney. Lowel
That which can be assorted without evidence was read in an illegal magazine.
Thanks for the kind words McD.
I have gleaned some technical build pearls from you as well...
Swaylocks Surfboard Design Forum: thoughts & theories ... practical & theoretical
RAIL PROFILE http://bgboard.blogspot.com/2014/03/march-82014-afterr-seeing-recent.html
abfab, thanks a lot!
Thanks very much for the link.
I am completely new to surfing and to this (shaping), but considering my history of skateboarding and snowboarding here in norway, when I friend had moved out west where there were waves, I guess I got smitten.
I work with wood, so I downloaded some templates from blendingcurves, having no real clue what I was doing in terms of surfboard design, and made two boards from local wood based on morgan surfboards youtube video on chambered wooden surfboards.
I guess I was kind of lucky that the things worked at all in the waves, but of course there are many more things for me to learn, especially about how different board features impact performance in the wave.
So, to get to the point of all this.
My friend suggested I try making a fish-type model for my next board and since I now had learned a little more about surfing and about shaping, the idea was that I wanted to make a traditional fish-model.
thanks for pointing me in the right direction, but there are a few things I think i perhaps misunderstood from the drawings or perhaps simply did wrong.
The reason why I think this is because I thought the shape I got when I plotted the numbers from the Steve Lis fish simply turned out strange.
So, in the column for the rocker table, it has a dash for 'tail' and then as far as I understood at 37" it is up 1/4" from flat/zero etc. Does this mean that in this rocker template the first 37" are flat? I hadn't seen that before, and I see that more of the other rocker outlines have the same, quite a long flat section at the towards the tail, is this correct?
Secondly, when I plotted in all the numbers, and drew the line, all the way up at the nose the curve didn't simply seem to flatten out, but to almost slope downwards again, and I couldn't work this out to be correct. At 63" it says gives a lift of 3" and at 'nose' which at 5' 5" should be 66" according to my calculation (another challenge is that I am not so familiar with feet and inches as all building work in norway is done in meters, centimeters, and millimiters, so I have to convert all numbers to double check). When I plot these numbers down on paper I get a funny looking rocker outline, have you any experience with drawing this out on paper?
I am also asking myself whether I am reading these tables all wrong, but since I have gone through it a few times and am not happy with the result, I see no other option than to ask here, as there are no experienced shapers in the middle of norway I can ask!
Sorry about such a lenghty verbal elaboration, but I'm in a bit of a shit here..
the thought was, as I said, to learn to shape by making some 'standard models' and learn from that, but no other fish rocker outline I have found are completely flat toward the tail.
the first picture is of the rocker near the nose as it falttens out, the second is the result of my first efforts and attempts with epoxy, which I think was problematic directly onto the wood with no cloth.
thanks to anyone who can help
david h.
Norway
IMG_20210829_183505.jpg
IMG_20210601_111226.jpg
Those illustrations are from 35+ years ago and reflect a design that was 10+ years older than that. Certain limitations in the renderings would be nearly inevitable.
Others will disagree but IMO, the numbers are the result of the curve, not the other way around. Perhaps better to chase the curve you're after than to fall into the trap of being a slave to the numbers. Most people making that design today are using somewhat different curves for the bottom anyway. Not radical differences, but differences nonetheless.
This mirrors one of my axioms of shaping. '' Let the ideal curve dictate the numbers. Don't let the ''ideal'' numbers dictate the curve.'' Good call, gdaddy.
@ OneH20
I used those old Lis Fish graphics to demonstrate how length/width ratios could be changed to re-size a surfboard template. I have used that planshape outline as a "guide" for generating a template.
You asked for rocker numbers for that specific template. However those numbers are for a "curve" with a more gradual sloped curve. Linking those points with straight line segments eliminates the curve. If you want to use those numbers, you should probably use them to plot a best fit curve.
I use two different half-ellipses to design rocker curves.
Here are some links to other Fish templates:
More modern:
https://swaylocks7stage.s3.us-east-2.amazonaws.com/s3fs-public/UNCLE%20C...
Retro:
https://swaylocks7stage.s3.us-east-2.amazonaws.com/s3fs-public/UNCLE%20C...
From this thread:
https://www.swaylocks.com/forum/46389/aku-gurus-designing-shape-copyrigh...
Swaylocks Surfboard Design Forum: thoughts & theories ... practical & theoretical
RAIL PROFILE http://bgboard.blogspot.com/2014/03/march-82014-afterr-seeing-recent.html